Set Up Smart Lock Assignments
Map each room to a lock, then run Test PIN Generation once. This takes about 5 minutes.
This guide helps you assign smart locks to rooms and confirm PINs in Smart Lock Setup.
Quick reference
| Task | What it does | Where you click |
|---|---|---|
| Assign a lock | Links a lock to a room or door | Available Devices list |
| Remove a lock | Unlinks one lock from the room | Assigned Devices → Remove (X) |
| Reset mappings | Clears all locks for one room | Reset Mappings |
| Test PINs | Generates temporary test codes | Test PIN Generation or Test All |
| Suggest matches | Auto-matches by name similarity | Suggest Matches |
| Refresh locks | Syncs status, capabilities, and bridge IDs | Refresh Locks |
| Combined rooms | Lets one PMS room open multiple physical rooms | Set Up Combined Rooms |
Where to find it
- Go to Settings → Room Access.
- Select Smart Lock (PIN) and connect a vendor.
- Scroll to Smart Lock Setup.
Finish vendor setup first:
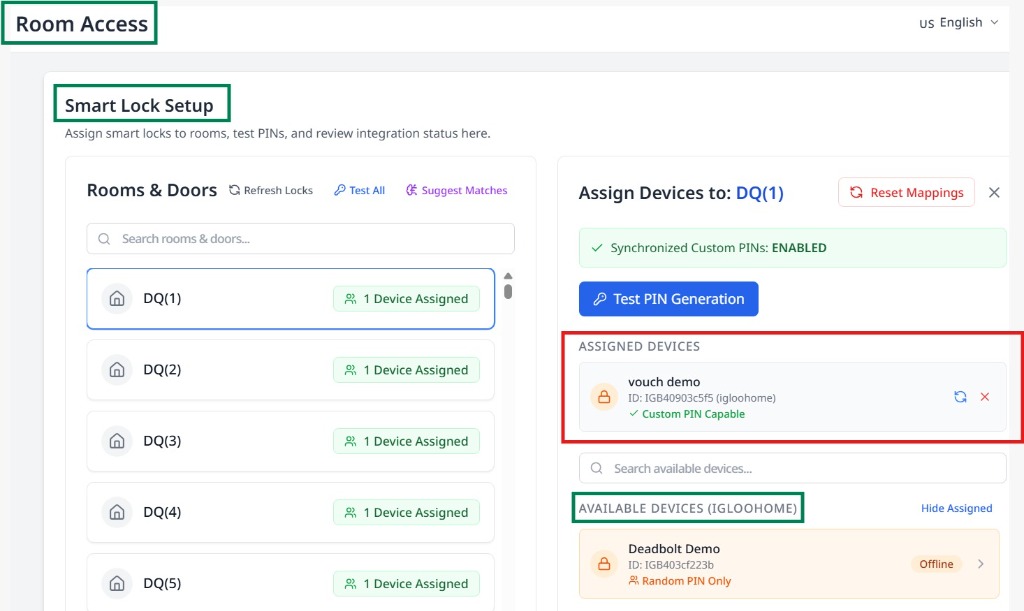
Step 1: Choose a room or door
-
In Rooms & Doors, use Search rooms & doors... to filter.
-
Select a room or door to open the assignment panel.
-
If no lock is assigned, select Assign Lock.
✓ The panel shows Assign Devices to: [Room Name].
If one PMS room should open several physical rooms, set up Combined Rooms first.
Keep locks assigned to the physical rooms, such as 306A and 306B.
Combined rooms are managed from the Combined Rooms button on this page.
Rooms with aliases show an Opens N rooms badge in the list.
Step 2: Assign a lock
-
In Available Devices, use Search available devices... to find the lock.
-
Optional: toggle Hide Assigned / Show All to include locks assigned elsewhere.
-
Select the lock row to assign it.
✓ The lock moves into Assigned Devices for that room.
Adding a Random PIN Only device disables synchronized custom PINs for that room. You must confirm before the assignment completes.
Step 3: Review sync and capability labels
Use these indicators before you test PINs:
| Label | What it means |
|---|---|
| Synchronized Custom PINs: ENABLED | All assigned locks support custom PINs and can share one code. |
| Synchronized Custom PINs: DISABLED | At least one lock is Random PIN Only and will generate unique PINs. |
| Custom PIN Capable | The lock accepts a user-defined PIN from AVA. |
| Random PIN Only | The lock can only accept vendor-generated PINs. |
| Assigned Elsewhere | The lock is already mapped to another room or door. |
Click Refresh Locks after vendor changes or new assignments. AVA updates capability labels from the lock itself, then hides unsupported actions.
Step 4: Test PIN generation (single room)
-
Select a room with assigned locks.
-
Click Test PIN Generation.
-
Confirm Start Test.
✓ The results panel shows success, partial, or failed details.
Test PINs are valid for 60 minutes and do not affect live reservations. Bridge-backed locks may show Pending briefly before the result turns Succeeded.
Step 5: Test all rooms (optional)
- In Rooms & Doors, click Test All.
- Review progress and results in Test All Results.
- Select Cancel to stop the run.
Step 6: Remove or reset assignments
Remove one lock
-
In Assigned Devices, find the lock.
-
Select the Remove (X) icon.
-
Confirm the removal.
✓ The lock disappears from the room.
Reset all locks for a room
-
In the assignment panel, select Reset Mappings.
-
Confirm Reset mappings.
✓ The room has zero assigned devices.
Guests cannot access that room until you assign locks again.
Step 7: Refresh lock data
-
Click Refresh Locks to sync status, capabilities, and bridge IDs.
-
In Assigned Devices, use the refresh icon on a single lock to update just that device.
✓ The lock list updates without reassigning devices.
Step 8: Use Suggest Matches
- Click Suggest Matches.
- Review the list and uncheck any mismatch.
- Select Confirm [X] Assignments.
Suggestions use name similarity and room numbers. Only unassigned locks are included.
Troubleshooting
No locks appear in Available Devices
What you see: The list is empty.
Fix:
- Confirm the vendor shows your locks.
- Click Refresh Locks.
- Reconnect the vendor if the list is still empty.
No PMS rooms are available
What you see: You see "No PMS rooms available yet."
Fix:
-
Go to Settings → Essentials.
-
Open your PMS Integration settings.
-
Connect your PMS, then return to this page.
✓ AVA shows PMS rooms so you can assign locks.
Synchronized Custom PINs is disabled
What you see: "Synchronized Custom PINs: DISABLED" for a room.
Fix:
- Check for any Random PIN Only locks in Assigned Devices.
- Remove or replace those locks.
- Assign only Custom PIN Capable devices.
Test PIN Generation fails
What you see: A red result like "PIN generation failed for all locks" or "Failed to generate PIN."
Fix:
- Confirm the lock appears online in the vendor app.
- Click the refresh icon on that lock in Assigned Devices.
- Try the test again.
Still Stuck?
Contact success@vouch-technologies.com if:
- ❌ No locks appear after refresh and reconnect
- ❌ PIN tests fail for every room
- ❌ Reset mappings do not clear assignments
Helpful to include:
- Screenshot of the error
- Vendor name and lock model
- Time the issue started