How to Complete a Check-In
Most check-ins take 3-5 minutes when documents are ready. This guide describes the guest check-in experience on AVA's self-service kiosk or assisted check-in device.
This guide helps you understand and support the guest check-in process from reservation lookup to room access. Guests complete check-ins using AVA's check-in kiosk (accessed via QR code or URL) in three modes: self-service (CCI), staff-assisted (ACI), or pre-arrival.
How guests access check-in:
- Scan the QR code displayed at your property
- Visit the check-in URL you provide
- Staff can assist using the assisted check-in (ACI) interface
To manage reservations and room assignments from your staff dashboard, go to the Reservations page (home screen). This guide focuses on the guest-facing check-in experience.
This short video shows the full multi-room check-in journey from the guest perspective.
Quick Reference
| Step | Who completes it | Where it appears |
|---|---|---|
| Reservation Lookup | Guest or staff | Check In, Reservation Lookup, or Staff Access |
| Document Upload | Guest or staff | Guest Verification on each room card |
| Bulk Upload | Staff (for groups) | Upload All Documents button above room cards |
| Guest Information | Guest or staff | Guest Information → Fill |
| Signature | Guest (sometimes all guests) | Signature → Sign |
| Facial Verification | Guest (CCI or ACI, when enabled) | Facial Verification → Verify or the paired guest tablet |
| Deposit / Payment | Guest (self check-in only, when enabled) | Reservation Requirements |
| Check-In / Pre-Arrival | Guest or staff | Proceed to Check-In or Complete Pre-Arrival |
| Room Access | Staff or guest | Room Information |
Check-In Modes
| Mode | Best for | What changes |
|---|---|---|
| Pre-Arrival | Guests before arrival | No facial verification. Use Complete Pre-Arrival. AVA sends the first guest's estimated arrival time to supported PMSs. Room access is issued on arrival. |
| Self Check-In (CCI) | Guests on kiosk | Facial verification may appear. Deposit or payment can block Proceed to Check-In. |
| Assisted Check-In (ACI) | Staff-led check-in | One-device ACI runs on the staff device. Two-device ACI sends guest steps to a paired tablet. Both show staff-device readiness. |
This short video shows the full assisted check-in (ACI) flow from the staff perspective.
Before You Start
Confirm these items:
- The reservation is active (not cancelled or no-show)
- The guest has a passport or ID ready
- The room is ready or can be assigned
- Your keycard encoder or smart lock system is online
If ACI shows Staff verification recommended, select Verify Device and scan the latest one-time kiosk QR. Staff search and the active reservation list remain unavailable until verification finishes. State-changing ACI actions, including check-in, require the verified staff device. Demo mode remains available without device verification.
Step-by-Step Check-In
If Guest Step Auto-Advance is on, AVA opens the next required guest step after you save. If it is off, you must select the next step manually.
1. Find the reservation
-
On the Check In screen, scan the guest's passport or ID
-
If scanning is not available, select Use Confirmation Number Instead
-
Enter the confirmation number and select Continue
✓ You should see the reservation's room cards
If you repeat a lookup, AVA refreshes the current one-device ACI session. It keeps the existing lookup history and lets you continue on the same staff device.
Verify the staff device before loading or refreshing the active reservation list. After verification, AVA loads a fresh list for the current browser and hotel. If the credential is revoked or becomes unavailable, AVA clears the list and asks you to verify again.
If the guest's value is an OTA or external booking reference, enter it in the same field. AVA checks the confirmation number first, then uses the external reference as a fallback. For Opera reservations, AVA verifies the full record before selecting a result. If an exact reference lookup returns no result, AVA retries once with the reference in uppercase. AVA compares the reference without case differences on the full reservation record. Confirmation-number lookup behavior is unchanged. It checks the external reference and arrival date, so stale summary data does not select the wrong booking. If the details do not match or Opera returns ambiguous results, AVA does not select a booking.
Scan lookup only matches arrivals from yesterday and today. Use confirmation number for early or future arrivals.
If you use Cloudbeds, reservation lookup waits up to 20 seconds. If Cloudbeds stalls, AVA shows a service-unavailable error instead of hanging. Try the lookup again after a short wait.
If a scan lands on a cancelled or checked-out booking, AVA refreshes the name lookup and tries active matches again. If the refreshed result is still ambiguous, AVA shows the normal Multiple reservations found flow.
You may also see Verify Your Booking after scan lookup, confirmation-number lookup, or Room List document upload retries. This uses the same booking-name verification flow. If the booking was already verified, AVA keeps that result when you retry. In ACI, staff can confirm the override instead of sending guest OTP when the property enables it. See ACI Staff Override for Name Mismatch.
Verified Mews rate-included products can follow a matching room-package waiver. Room-relative service charges also follow that waiver, even when Mews reports Once but posts them nightly. If AVA cannot prove the classification, it withholds the amount for staff review. When room payment collection is enabled, AVA blocks reservation lookup and routes the guest to the front desk. It does not use a stored balance or collect an unverified amount. Compare any unexpected amount with the live Mews bill before collecting payment. See Billing Review Required Before Check-In.
If you are using Assisted Check-In (ACI)
Manual grouping works in ACI when the kiosk has a verified staff credential. One-device ACI uses its existing credential without starting the two-device runtime. CCI and ordinary AVA sessions cannot authorize manual grouping.
- On the welcome screen, select Check In
- Open Staff Access
- Search by guest name, reservation ID, or external booking ID
- Select the correct reservation
✓ You will see the room list
If you use OPERA, AVA searches its guest profile directory during name searches. This helps staff find active reservations when multiple guests share a name. After selecting one reservation, review Other reservations with the same guest name. Select only reservations that belong to the same arrival.
Some Mews bookings share the same external booking ID. Even when Mews reuses a family ID, AVA keeps each stay separate. Guest, room, dates, status, and totals stay on that reservation.
Group separately booked same-name reservations in ACI
Use this option when one guest has separate OPERA reservations for the same stay. It combines rooms for this ACI journey without changing the reservation family in OPERA. You do not need to enter another confirmation number manually.
Manual grouping requires a verified kiosk staff credential. This action works in one-device and two-device ACI. One-device ACI uses its existing credential without starting the two-device runtime. If needed, select Verify Device on the ACI readiness panel. Use Settings → Kiosk → Re-verify staff device when the scanner is unavailable. If verification fails during grouping, AVA shows the staff-device guidance inline. It does not treat the failure as a missing reservation or use an unverified credential.
-
Select the primary reservation in Staff Access.
-
Review Other reservations with the same guest name (optional).
-
Select each additional reservation that belongs to the same arrival.
-
Check each selected reservation's number and stay dates.
-
Select Proceed.
✓ AVA opens the combined rooms in one assisted check-in flow.
Use only reservations with the same main guest and overlapping stay dates. Do not select cancelled, no-show, checked-out, or already checked-in reservations.
| Reservation | What AVA does |
|---|---|
| Primary | Keeps its main guest as the primary guest for the check-in |
| Additional | Waives only that reservation's main guest registration |
| Additional guest updates | Adds the staying guest without overwriting the primary guest |
How AVA counts guests in grouped rooms
In each additional room, AVA hides the copied main guest from the additional reservation. That copied profile does not use a guest slot or increase PMS occupancy. You can register the actual guests booked for that room.
For example, a room booked for two guests accepts two registrations. The PMS occupancy remains two after the grouped ACI check-in.
This behavior applies only to reservations selected for manual ACI grouping. Ordinary ACI groups and unrelated duplicate identities keep their existing behavior.
Select reservations only when they belong to the same guest and arrival. The manual grouping link applies only to the current ACI journey.
Staff Access only shows arrivals from yesterday and today. To find any other date, search by confirmation number.
If Opera or another PMS sends a historical business date, ACI can still complete the check-in. AVA keeps the calculated dates for diagnostics and shows manual room-access instructions. This exception does not apply to Smart Locks, Keycards, or Lockers.
If the guest completed pre-arrival
Find the reservation by confirmation number, then continue with Proceed to Check-In on arrival.
2. Review rooms and guests
Confirm each room has the correct guests. The ★ marks the main guest.
For multi-room reservations, AVA asks which room you are checking in to first. This appears on phones and small tablets in portrait mode when two or more rooms remain open.
- Review each room tile.
- Check the room number, type, confirmation number, and booked guest names.
- Select the room tile you need.
✓ AVA opens that room in the Room List.
The chooser appears before guest registration starts. After registration begins, use the room context or Change Room to correct a guest's room.
If the reservation has multiple rooms
- Select Set Your Rooms
- Move guests into the correct rooms
- Use Change Room to move a guest later
- Select I'm Done when all guests are assigned
The add-guest area shows the room that will receive the guest. For example, you may see Adding to Room 2 of 2 · Twin Deluxe.
- Confirm the room number and room type before selecting Add Guest.
- Select Wrong room? if the displayed room is incorrect.
- Choose the correct room from the room chooser.
When a room finishes, AVA announces the next room instead of changing silently. Check the Room 1 is complete or Now showing Room 2 of 2 message before continuing.
Change Room now keeps the guest you selected, even when that guest has no document uploaded yet. This prevents AVA from moving the wrong person in multi-room reservations.
Once a guest is Verified, AVA hides Change Room. Move the guest before the final verification step.
If you reopen Change Room before check-in finishes, AVA shows Room 1, Room 2, and so on. You will still see the room type below each label.
If you use Opera OHIP, AVA keeps the room you searched as the main room card after lookup.
This stays true even when Opera normalizes the family to the main confirmation.
If Opera repeats the same nameId in another room, AVA leaves that later room's guest slot empty for staff input.
This helps even when OPERA stores guest records with different internal IDs.
For explicit SiteMinder multi-room families, AVA also reconciles the repeated accompanying profile shape.
It shows only the guest slots supported by the declared adult occupancy across the family.
If AVA cannot prove the family or occupancy is safe, it keeps the original guest list.
If you use Cloudbeds, AVA keeps the main reservation synced after room assignment. This keeps the room card accurate when Cloudbeds splits one booking into sub-reservations.
Furama iPMS v2 keeps each room in a multi-room stay as its own room entry. Select the room card before assigning the room, checking in, or adding guests. AVA sends the action to that room instead of the first room in the stay. Process the remaining rooms separately.
When check-in starts, AVA rechecks every assigned room. If one room is not ready, the whole family stays blocked. For Opera, AVA only accepts the room already assigned to that reservation. If Opera returns a different available room for a Dirty preassigned room, AVA keeps the original room blocked. If Opera represents a suite with component rooms, AVA also checks every linked member. An occupied member keeps the occupied reason as the priority status. If an automatically selected component suite cannot be verified, AVA blocks the assignment.
If one room in a multi-room booking is cancelled or checked out, AVA skips that room. You only see active room cards after lookup.
AVA blocks moving the reservation's main guest between rooms during check-in. If you need to move the main guest, update the room assignment before check-in starts.
If staff updates the room in your PMS, AVA refreshes the current room before room assignment opens. You see the latest room number and room ID, not the older check-in record. If the PMS now shows no room, AVA clears the stale local room and retries with roomless auto-assign when that setting is on.
If you use Opera OHIP, AVA keeps the charged room type unchanged when it assigns a new physical room. That keeps the folio room type stable during room changes.
Review ACI room status
In two-device Assisted Check-In (ACI), each room card shows PMS room information after reservation lookup. These room details and room actions are available only in two-device ACI. One-device ACI does not load PMS operational room data.
| Field | What it means | What you should do |
|---|---|---|
| Assigned room | The room currently assigned in your PMS | Confirm it matches the reservation |
| Room status | PMS condition and status code | Continue when the room is Clean or Inspected |
| Occupancy | Whether the PMS reports the room as Vacant or Occupied | Confirm the room is vacant before check-in |
Room conditions include Clean, Dirty, Inspected, and Out of service. The short code beside the condition comes from your PMS. If your PMS has not assigned a room, Assigned room shows Unassigned. If housekeeping data is missing, Room status and Occupancy show Unavailable.
If a room is Dirty, Out of service, or Occupied, AVA shows a readiness warning.
- Select Find ready rooms.
- Review rooms with the same room type that are vacant and ready.
- Select a room, then select Confirm.
✓ AVA updates the PMS assignment and refreshes the room information.
AVA checks the selected room again before reassignment. If the room is no longer ready, refresh the ready-room list and choose another room.
Select the refresh icon beside Assigned room after a PMS room change. AVA saves a new assignment only when the PMS returns one matching room. If the PMS returns no room or an ambiguous multi-room result, AVA keeps the stored assignment. The status fields show Unavailable until the PMS returns a clear match. For Opera, a valid empty out-of-service response means no rooms are blocked for that condition. A missing or malformed response remains Unavailable and needs PMS review.
Reassign a room before check-in and before room access is issued. After either event, ask staff to update the assignment in your PMS.
If you need to add missing guests
- Select Add Guest for that room
- Upload the guest's document
- Complete their guest information
For Furama, you can add several room sharers in one save. Enter each guest's details instead of selecting an existing guest profile. Furama has no guest-profile directory, so adding a guest by ID is unavailable.
If you use Opera OHIP, AVA also updates the room guest list in Opera when you save. That keeps the added guest attached to the room after check-in.
When Opera uses an accompanying guest profile, AVA keeps the existing main guest as the reservation's primary profile. AVA refreshes the authoritative Opera reservation before attaching the accompanying profile. If the main guest is still missing, or more than one main guest appears, correct the reservation in Opera. Then refresh the reservation and retry the guest assignment once. Do not create a replacement profile manually in Opera.
If a guest is not present
- Select Check In Later under that guest
- When they arrive, select Check In Now to resume their steps
✓ The guest is skipped and does not block the main guest
3. Upload documents
-
In the guest's Guest Verification section, select Document Upload → Upload
-
Scan the guest's passport or ID
✓ The document status switches to complete and the document number appears
In ACI, saving a document does not change PMS occupancy. AVA checks occupancy when it creates or syncs a pending companion during Registration. AVA checks occupancy again before final Proceed to Check-In. If Cloudbeds rejects capacity or rate, the uploaded document remains saved. Fix the guest count or rate in Cloudbeds, then retry the blocked step.
Tip: If multiple guests are checking in, use Upload All Documents at the top of the page. See the section below for details.
If the guest switches between front and back camera, AVA updates the scan guidance automatically. This keeps the on-screen instruction matched to the active camera.
Need to confirm which IDs are allowed? See Accepted Travel Documents.
If you see a duplicate document warning
You may see "Passport Already Uploaded" or "This passport is already registered to...".
- Select Scan Another Guest's Passport to continue scanning
- Select Go to Existing Guest to review the original guest
If the guest recently changed rooms, wait until the move finishes, then retry the scan. AVA keeps claims aligned during moves within the same reservation family. An old claim that no longer matches a live guest can clear automatically after 15 minutes. Fresh or unverifiable claims remain blocked for safety.
Using Upload All Documents for multiple guests
When checking in a group, Upload All Documents lets you scan all passports in one session before saving them.
Scan beyond booked guests in ACI
In Assisted Check-In (ACI), bulk upload can use the room's capacity. This lets you scan extra guests who are not on the original booking.
AVA shows booked guests first as required slots. Empty spare-capacity slots stay optional and do not block completion. They also stay out of the review list and Scanned count until you use them.
After all booked documents are scanned, select Add extra guest. You can also select Add an extra guest's passport or ID in the review step. The scanner labels this slot Extra guest. Select Proceed to skip it when you do not need the spare slot.
The room capacity must be greater than the current guest count. CCI and pre-arrival keep their existing booked-guest limit.
For eZee rooms, AVA treats adult and child maxima as limits on the same beds. AVA uses the larger category maximum, while keeping the configured base occupancy. It does not add the adult and child maxima together.
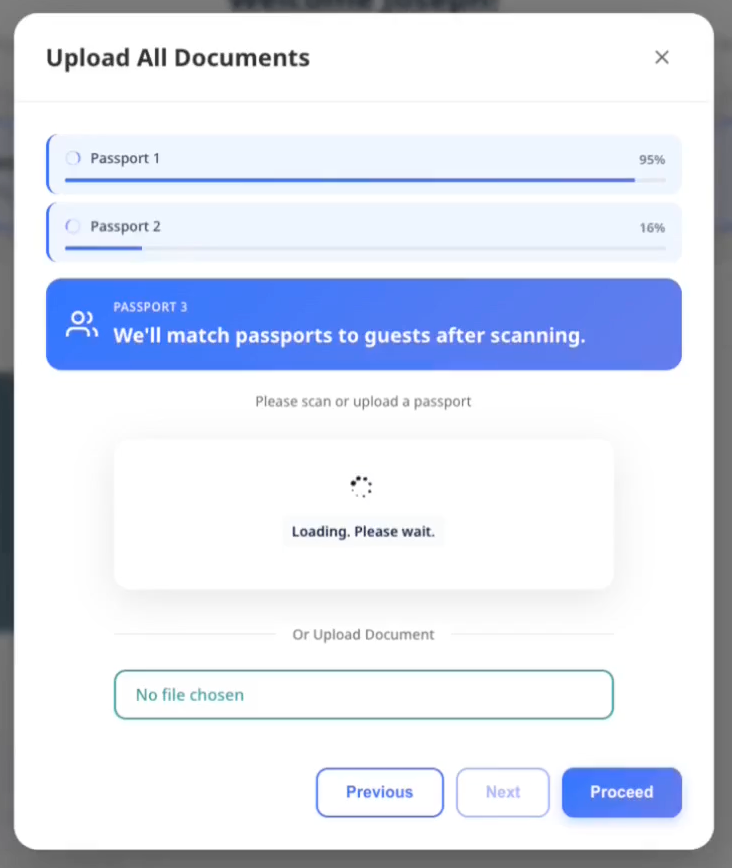
Step 1: Scan all passports
- Select Upload All Documents at the top of the room list
- Scan each guest's passport one at a time
- A progress tracker shows each passport's upload status
- If a scan fails, select Rescan passport to try again
Step 2: Review and assign
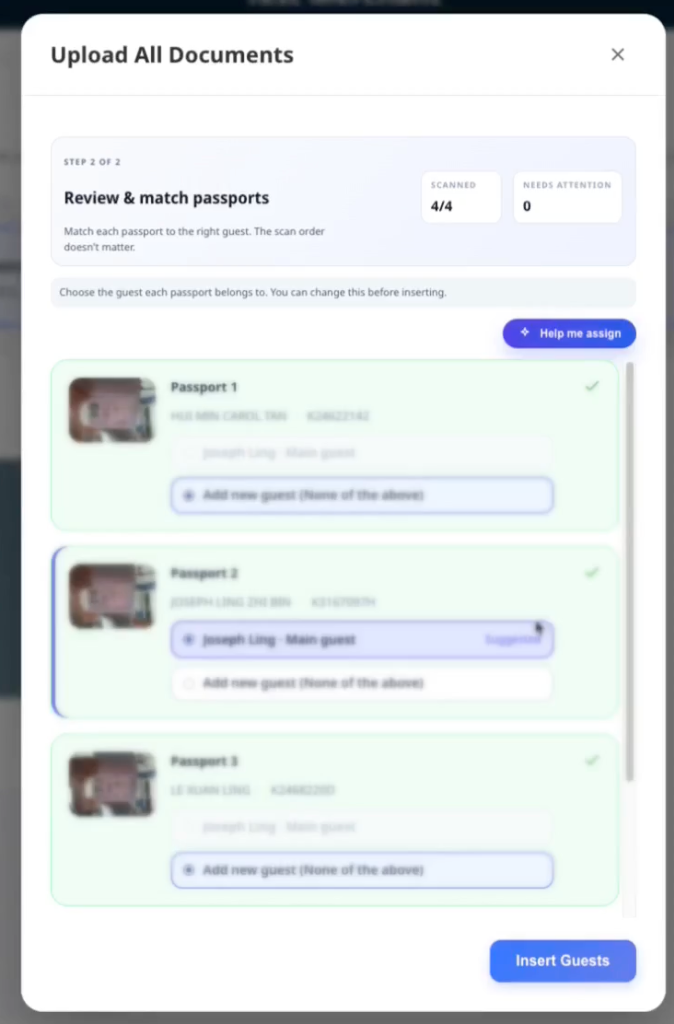
After scanning, you see a list of all passports ready to assign.
- The system suggests which guest each passport belongs to based on matching names
- If the suggestion is correct, no action is needed
- To assign a different guest, select them from the list
- To add someone new, select Create new guest
Assignment display:
- 3 or fewer guests: card-style selection buttons
- More than 3 guests: dropdown menu for compactness
Step 3: Save assignments
- Review all passport-to-guest assignments
- Select Insert Guests to save
- Any errors appear next to the affected passport
- Fix issues individually and retry if needed
Common errors:
- "Document number not detected" → rescan with better lighting
- "Already uploaded for [guest]" → assign to a different guest
- "Guest limit reached" → assign to an existing guest instead of creating new
- "Payment method is not enabled for reservations" → enable the payment method for reservation use in Opera, then retry
When Opera rejects an additional guest because of a disabled payment method, AVA shows a localized guest-safe message. Staff can still see Opera's payment-method detail in the error information. See Opera Additional Guest Payment Rejected.
Step 4: Verify the booking (only if a name differs)
If a scanned document's name does not match the reservation, AVA pauses on Insert Guests and shows a Verify Your Booking panel.
-
Read the prompt: "The document name differs from this reservation."
-
Check the booking email for a 4-digit verification code
-
Enter the code and select Verify Code
-
If the code does not arrive, select Resend Code (available after a short countdown)
✓ After the code is accepted, AVA saves the assignments automatically. You do not select Insert Guests again.
The Verify Your Booking panel appears when AVA needs extra booking confirmation. See Booking Name Verification for Partial Matches and Name Mismatch OTP Fallback. In ACI, the staff override can replace guest OTP when your property enables it. See ACI Staff Override for Name Mismatch.
4. Complete guest information
-
Select Guest Information → Fill
-
Confirm all fields. Required fields show a
* -
Update the Document Number if needed
-
Select Save
✓ The Guest Information step shows as complete
For additional guests, the Guest Information card shows Same contact details as [main guest name] at the top. Turn it on to copy shared values that are visible in the current guest form. For child guests, AVA copies only visible fields, such as shared address or travel details. Hidden Email and Phone fields remain untouched for child guests. When address or travel information is available, AVA explains that it will copy those fields. Copied fields stay visible and editable. Turn the option off to restore the child's values from before the copy. If a child has no address or travel information to copy, AVA disables the toggle and shows a manual-entry hint. For other additional guests, AVA disables the toggle when the main guest has no visible shared values.
For a manually grouped ACI reservation, AVA keeps the primary reservation's main guest unchanged. For each selected additional reservation, AVA skips only that reservation's main guest registration. Add the staying guest's document and information to that room. If you update the skipped guest's name, AVA creates an additional guest instead. Email, phone, or address-only updates remain on that guest record. This prevents the update from overwriting the primary guest.
If the guest has no phone number, AVA uses the passport nationality for the default country code. Existing phone numbers keep their saved country code.
When guests type address or travel fields, AVA biases Google Places toward the guest's nationality. If nationality is blank, AVA falls back to the hotel country.
If you see a warning under Document Number, double-check the ID. Warnings do not block check-in.
If guest information save fails
What you see: The Guest Information card shows an error state after you select Save.
Fix:
-
Check the required fields and correct any invalid values.
-
Open Guest Information → Fill again.
-
Select Save.
-
If the error returns, refresh the page and try once more.
✓ The card should return to the saved state after a successful retry.
In two-device ACI, AVA saves guest edits as drafts after a field loses focus. The paired staff device automatically refreshes the open Guest Information form after a matching update. AVA refreshes only the active reservation and guest, so other open forms stay unchanged. Your unfinished local edits remain in the form during the refresh. Draft saving does not replace final Save or mark the step complete.
Guest information changes do not appear on the staff device
What you see: A guest edits information, but the staff device still shows older values.
Fix:
-
Ask the guest to finish editing the current field.
-
Ask the guest to tap outside the field.
-
Wait briefly for the draft update.
-
Keep the matching Guest Information form open on the staff device.
-
Confirm the refreshed values, then select Save.
✓ The staff device should show the latest saved guest information.
If the form does not refresh, reopen Guest Information → Fill and try again.
5. Capture the signature (if required)
-
Select Signature → Sign
-
Capture the guest's signature
✓ The Signature step shows as complete
Note: By default, the main guest must sign. Some properties require all guests to sign.
Optional privacy-consent syncing does not block signature submission. If the PMS is slow or unavailable, AVA continues the check-in and retries the consent sync. AVA saves the signature first, then completes downstream syncing in the background.
6. Run facial verification in CCI or ACI
If Facial Verification is visible:
-
Select Facial Verification → Verify
-
Follow the on-screen camera prompts
✓ The Facial Verification step shows as complete
Tip: Facial verification appears in Self Check-In (CCI) or Assisted Check-In (ACI) when enabled for that mode.
Note: AVA compares the clearest face on the document first. This helps faint passport watermarks stay out of the way.
AVA saves a successful facial-verification result before completing downstream syncing. If a connected service is slow, continue the check-in while AVA finishes that sync.
If you are using two-device ACI
-
Staff send Facial Verification to the paired guest tablet.
-
Ask the guest to follow the camera prompts.
-
If the match fails, re-send the same facial step from the staff panel.
✓ The guest tablet reopens the camera and clears the previous mismatch state.
If the next attempt fails, use Staff override when your property allows it. In two-device ACI, the paired guest tablet and the active facial failure must remain visible. The verified staff device must be linked to that current ACI journey. Enter a reason after checking the guest's identity in person. See Set Up Facial Verification.
If facial verification fails
- Select Take another selfie for a clearer photo
- If it still fails, select Re-upload document and scan again
7. Collect deposit or payment (self check-in only)
If Reservation Requirements shows Deposit or Payment:
-
Select Pay
✓ Pay changes to Processing with a spinner and becomes unavailable while AVA prepares the payment step.
-
Complete the payment steps
✓ The payment requirement shows as complete
AVA checks the room quote and eligible packages before opening the next payment step. Wait for that step to appear. Do not select Pay again while it shows Processing.
If the terminal payment already completed, AVA keeps the requirement complete on retry. Do not start a second payment unless the receipt shows a failed charge.
Note: Check-in cannot complete until all shown payments are successful.
8. Finalize the check-in
-
Select Proceed to Check-In
-
Wait for the progress screen to finish
✓ The room card shows the check-in completed state
Tip: During check-in, the system runs Checking Availability → Assigning Room → Generating Keys → Finalizing.
If this is a pre-arrival registration
- Complete all required steps above
- Select Complete Pre-Arrival instead of Proceed to Check-In
✓ The room is marked as pre-arrival completed. Room access is issued when the guest arrives.
If your PMS supports ETA updates, AVA sends the first guest's estimated arrival time back after pre-arrival. If your PMS does not support it, the check-in still completes normally. Opera/OHIP reservations now support this update path.
If the room is already checked in
Select Proceed to Check-In to complete remaining guests. This does not reassign the room.
9. Provide room access
After check-in, open Room Information on the room card:
- Room Number is shown at the top
- Room Access depends on your property setup
If you use Keycards:
If you use Opera with a PMS-integrated encoder, AVA waits for the confirmed key status first. Older Opera responses can omit that status. AVA then checks the saved room, key count, and validity window for up to 30 seconds. If the request still times out, retry the card from the same room.
Before encoding, AVA confirms the room through your PMS when the reservation card lacks a usable room value. Valid PMS room identities remain valid, including long AVA PMS identifiers. You do not need to edit or shorten the room identity.
-
If you are in ACI, confirm the handover first.
-
Select Retrieve Keycard to encode the card now.
-
If the keycard was encoded in advance, select Already Encoded.
-
Encode each card when prompted.
-
If you need fewer cards, select Complete Check-In in the keycard modal
✓ If one encoder is online, AVA briefly shows Preparing keycard encoding... before encoding starts.
AVA stays on the current room until the keycard finishes encoding successfully. The next room opens after the final successful encode response marks the card as retrieved.
If the Win A Complimentary 1-Night Stay modal appears, close it first. Then select Complete Check-In.
If you use Smart Locks:
-
Select Show PIN
-
Share the PIN with the guest
✓ If the room access card still shows Pending or Partial success, wait for a ready status first.
If you use Lockers:
- Share the Locker Number
- Select Show Code and share the locker code
If you see a room access message instead of a code, follow the on-screen instructions.
Manage Locker Code and locker codes appear only when Settings → Room Access is set to Locker Systems. If AVA is still loading room access mode, wait and retry from the room card.
Tip: If WiFi is configured, the WiFi section shows the name and password. Room notes appear under General Information.
Room-card messages follow the guest language, even with regional codes like ko-KR.
If you are using Assisted Check-In (ACI)
After check-in, the screen shows Check-In Complete and asks the guest to return the device. If the room uses keycards, confirm the handover first. Then the keycard controls appear on the room card. Use Retrieve Keycard for new cards or Already Encoded for cards prepared in advance. In demo mode, the keycard buttons appear after handover. In multi-room stays, AVA waits for keycard success before opening the next room.
Troubleshooting
Staff device verification is required for ACI operations
What you see: Staff search, reservations, checkout, or a check-in action is unavailable. ACI shows Staff verification recommended.
Why this happens: The exact browser's STAFF credential is missing, stale, revoked, or belongs to another device or hotel.
Fix:
- Confirm you are using the intended staff browser or kiosk device.
- Ask an admin to display the latest ACI verification QR from Settings → Kiosk.
- Select Verify Device in the ACI readiness panel.
- Allow camera access, then scan the QR.
- Wait for the current ACI page to reload and retry the specific flow.
The scanner keeps verification inside the current browser context. This helps preserve storage in a Web Clip, PWA, or browser wrapper. The QR is one-time use, so generate a replacement if it was already scanned.
During verification, AVA keeps all five numbered instructions visible. The responsive preview and status strip show camera progress, the scan hint, or a camera error. On landscape screens, the preview sits beside the instructions. See Verify the ACI staff device.
If the scanner cannot open, use Settings → Kiosk and select Re-verify staff device. Complete the latest one-time link on the same physical device.
AVA may recover a stale credential automatically when the exact verified browser still has its reset authorization. After recovery, AVA performs a fresh reservation-list load before showing staff operations. If readiness is lost, AVA clears stale reservations and checkout selections. Kiosk verification and demo mode continue to use their existing paths.
One-device ACI stops after a repeated lookup
What you see: After searching again, one-device ACI does not continue. You may see "Unable to bind the assisted check-in journey to this staff device."
Fix:
- Search for the reservation again from the same Staff Access screen.
- Wait for the reservation's room cards to appear.
- Continue check-in on the same staff device.
- If AVA asks for staff verification, follow Staff device verification is required for specific flows.
If the journey remains blocked after one retry, refresh AVA and contact support.
Cloudbeds reservation lookup times out
What you see: The lookup keeps spinning, then shows a timeout or service-unavailable error.
Why this happens: AVA stops waiting after 20 seconds if Cloudbeds does not answer.
Fix:
- Wait a few seconds.
- Try the lookup again.
- Confirm Cloudbeds is reachable and the reservation exists.
- Contact support if the timeout keeps happening.
Reservation not found after scan
What you see: "Reservation not found" or you are sent to the confirmation screen.
If the first match is inactive, AVA refreshes the name lookup and tries active bookings again. You may see the replacement booking without searching again.
AVA retries an Opera OTA or external reference once in uppercase when the exact lookup returns no result. If the reservation still does not appear, search with its confirmation number.
Fix:
- Enter the confirmation number instead of scanning
- Confirm the arrival date is today or yesterday
- Check the reservation is not cancelled or no-show
Multiple reservations found
What you see: "Multiple reservations found."
Fix:
-
Search by confirmation number
-
In Staff Access, search by reservation ID or external booking ID
-
For ACI with OPERA, search the guest's full name in Staff Access.
-
Select the primary reservation, then review Other reservations with the same guest name.
-
Select additional reservations only when they belong to the same arrival.
✓ Each selected reservation appears as a separate option before you continue.
Same-name reservation grouping is unavailable
What you see: You cannot select same-name reservations, or AVA rejects the grouping. If authorization fails after you select the reservations, AVA shows staff-device verification guidance inline. It does not open the reservation-not-found modal.
Fix:
- Confirm you are using Assisted Check-In (ACI).
- Confirm the kiosk staff device is verified for manual grouping.
- Search the guest's full name in Staff Access.
- Select the primary reservation first.
- Select only active reservations for the same guest and overlapping dates.
- Remove reservations already checked in, due out, cancelled, or part of another group.
If the kiosk credential is unavailable, AVA stops the grouping action locally. It does not send the grouping request to the API. Verify the kiosk device, then retry the grouping action.
If AVA rejects the request after it reaches the server, re-verify the intended staff device. This protects grouping from missing, invalid, wrong-role, or wrong-merchant credentials.
Manual grouping requires a PMS connection that supports atomic multi-room check-in. Contact support if eligible OPERA reservations still cannot be grouped.
An additional room shows an extra guest
What you see: An additional room shows the copied main profile. You cannot register the final booked guest.
Fix:
-
Confirm you selected the reservation in Other reservations with the same guest name.
-
Confirm the reservation belongs to the same guest and arrival.
-
Leave the grouping flow, then start it again from Staff Access.
-
Check that the copied profile is hidden before registering the room's actual guests.
✓ The additional room accepts its booked guests without increasing PMS occupancy.
Contact support if the copied profile still appears after restarting the grouped ACI flow.
Check-in button is disabled
What you see: Proceed to Check-In shows "Complete all steps."
Check:
- All guests have Document Upload complete
- Guest Information is saved for each guest
- Signature is complete for required guests
- Facial Verification is complete when required for CCI or ACI
- Deposit and Payment are complete if shown
- Missing guests are marked Check In Later or added
Payment step does not open
What you see: Pay stays disabled and shows Processing.
Fix:
- Wait while AVA prepares the room quote and checks eligible packages.
- Do not select Pay again. AVA blocks duplicate payment starts.
- Contact support if the next payment step does not open.
Room not ready or too early
What you see: "Room not ready", "No rooms available", or check-in fails after Proceed to Check-In.
Fix:
- Check room status in your PMS or Room Status
- Assign a different room if allowed
- Select Continue registration if the guest still needs to finish other rooms
- Select End session if you want to stop the current check-in
- Follow your early check-in policy
For two-device ACI, check the room card first. If it shows Dirty, Out of service, or Occupied, select Find ready rooms. If the status shows Unavailable, select the refresh icon and check your PMS connection.
For Cloudbeds, AVA reads the latest reservation, unassigned-room, and housekeeping data before automatic assignment. It requests vacant housekeeping rooms explicitly, then confirms the selected room again. AVA stops the assignment when these reads are too far apart or the check takes too long. This prevents a room from being assigned after its PMS status changes.
When you select Continue registration, AVA keeps multi-room guests in the current Room List flow. You can finish the remaining rooms without sending everyone back to the home screen.
End session uses the same kiosk exit behavior as the top bar. It closes the current session and returns the guest to the kiosk start screen.
If you use Opera, disallowed room conditions now use the same room-not-ready flow. For component suites, check every linked member room before retrying.
If one room in a multi-room reservation is still not ready, AVA blocks the whole family. Check every assigned room in Housekeeping or your PMS before retrying.
If no room is available after check-in time, AVA queues the reservation and sends the room-not-ready emails. The room-ready email still sends later.
For Furama, AVA checks a preassigned room before writing an assignment. The room must be verifiably vacant and free from occupancy, lock, out-of-service, or maintenance blocks. An approved Dirty room remains eligible when Allow Vacant Dirty Rooms is enabled. If the room fails these checks, AVA does not write the assignment and uses the Room Not Ready flow.
ACI room assignment does not refresh
What you see: The room status shows Unavailable, or the room number stays unchanged after a PMS update.
Why this happens: The PMS has not returned one clear room assignment for the reservation.
Fix:
-
Confirm the room assignment in your PMS.
-
In two-device ACI, select the refresh icon beside Assigned room.
-
Wait for the room status and occupancy to update.
-
If multiple rooms appear, keep the intended assignment in your PMS.
-
Refresh AVA again after the PMS update finishes.
✓ AVA updates the room when the PMS returns one matching assignment.
Cloudbeds room assignment needs a fresh status
What you see: Cloudbeds room assignment stops with a stale-availability or assignment-timeout message.
Why this happens: Cloudbeds room, reservation, and housekeeping results did not describe one current state. AVA stops before writing an assignment when the results are stale or the shared time limit expires.
Fix:
-
Open the reservation in Cloudbeds.
-
Confirm the reservation dates and room type.
-
Check that a matching room is Vacant and ready in Cloudbeds housekeeping.
-
Resolve any room change or housekeeping update still in progress.
-
Refresh the reservation in AVA.
-
Retry room assignment once.
✓ AVA should assign the room after Cloudbeds returns matching current statuses.
AVA does not automatically replay the final room-assignment write after a timeout. Confirm the room assignment in Cloudbeds first, then retry only when no assignment occurred.
Optional offer modal blocks completion
What you see: The Win A Complimentary 1-Night Stay modal appears before Complete Check-In.
Fix:
- Close the modal
- Select Complete Check-In again
Document upload failed
What you see: "Document upload failed" or the upload stops.
Fix:
- Try scanning again with better lighting
- Select Upload Document and choose a clear photo instead
- If the issue persists, use Use Confirmation Number Instead
Document scans do not trigger a PMS occupancy update in ACI. If the document already saved, do not scan it again after a capacity or rate error. Retry Registration or final Proceed to Check-In after fixing the PMS reservation.
Passport shows only a birth year
What you see: The passport prints a birth year, but no full birth date.
Some passports officially publish only the birth year. AVA can accept this when the passport's machine-readable zone confirms the partial date. AVA leaves the birth date incomplete and never adds an assumed day or month.
Fix:
-
Continue check-in when AVA accepts the passport.
-
Do not enter January 1 as a replacement birth date.
-
Rescan the passport if AVA says the date is unreadable or missing.
-
Use even lighting and capture the full passport page.
✓ Official year-only birth dates can continue without weakening document verification.
Blur, glare, cropping, or missing passport fields still require a clearer scan. The trusted machine-readable zone distinguishes an official partial date from an unreadable document.
Cloudbeds occupancy is not bookable
What you see: Check-in stops with PMS_OCCUPANCY_NOT_BOOKABLE.
The staff error details show the attempted adult and child split.
Why this happens: Cloudbeds has no rate for that occupancy, room type, or stay. An incorrect date-of-birth classification can also create the rejected split.
In ACI, this check happens after document saving during Registration or before final check-in. If the document already saved, you do not need to upload it again.
Fix:
-
Check the attempted Adults and Children counts.
-
Verify guest dates of birth and Child Maximum Age in AVA.
-
Check the room type, dates, and occupancy rules in Cloudbeds.
-
Correct the reservation or rate plan in Cloudbeds if needed.
-
Refresh AVA and retry check-in once.
✓ Continue check-in after Cloudbeds accepts the corrected occupancy.
Retrying an unavailable occupancy does not create a Cloudbeds rate. Contact support if the corrected split still fails.
Cloudbeds has no availability for these dates
What you see: Check-in stops with PMS_OCCUPANCY_UNAVAILABLE_FOR_DATES.
The message asks you to change dates or choose fewer rooms.
Why this happens: Cloudbeds cannot accommodate the requested dates or room availability. This is different from an incorrect adult or child split.
The occupancy update does not complete. Do not repeat the same request while availability remains unchanged.
Fix:
-
Check the reservation dates, room type, and available rooms in Cloudbeds.
-
Choose an available room or date, or follow your hotel's front-desk process.
-
Refresh AVA after Cloudbeds shows the accepted availability.
-
Retry check-in once.
✓ Continue check-in after Cloudbeds accepts the requested availability.
Cloudbeds source tax setup needs review
What you see: Check-in stops with PMS_RATE_PRESERVATION_SOURCE_TAX_UNSUPPORTED.
You may also see that Cloudbeds occupancy was not changed.
Why this happens: AVA could not safely model the reservation source's tax or fee rules.
AVA treats this as a terminal error for the current guest-count change. It stores the source-tax marker and preserves the same guidance on later retries. Later retries do not send the same occupancy request to Cloudbeds again.
Fix:
-
Do not retry the same guest-count change before reviewing the source settings.
-
Open the reservation in Cloudbeds.
-
Check the booking source, room type, and source tax or fee rules.
-
Ask your Cloudbeds administrator to correct the unsupported source rule. This may involve mixed, non-percentage, unreadable, or multiple exclusive charges.
-
Refresh AVA and retry Registration or final check-in once.
✓ Continue check-in after Cloudbeds exposes a supported source policy.
AVA stops before the Cloudbeds occupancy write. This prevents repricing when AVA cannot safely restore the booked total. Later retries preserve this instruction without sending another occupancy request.
Cloudbeds may move a few cents between room revenue and tax while keeping the guest total unchanged. AVA accepts equal, opposite differences up to 10 cents. Source-aware updates can accept a coherent total difference up to 5 cents after final verification retries. Cloudbeds adds a note explaining the settled amount when the total differs. Do not post a manual correction for either rounding note. Larger or incoherent differences still require manual review.
If the reservation changes while AVA saves the guest count, the PMS can return PMS_RESERVATION_CONCURRENT_MODIFICATION.
AVA keeps the change pending and retries it automatically.
A plain 409 without this code remains permanent and uses the manual-review path below.
Guest-count reconciliation required
What you see: AVA shows guest-count reconciliation guidance during guest-information save or final check-in.
The error code is PMS_GUEST_COUNT_RECONCILIATION_REQUIRED.
Why this happens: The PMS quarantined the guest-count change for manual review. Retrying the same change cannot resolve the reservation.
Fix:
- Select End session.
- Open the reservation in your PMS.
- Reconcile the guest counts and reservation totals.
- Confirm the PMS reservation is correct.
- Start a new registration in AVA.
End session is the only recovery action for this message. Do not select Continue registration or retry the quarantined change.
Guest-count sync retry limit reached
What you see: The guest sees staff-assistance guidance after repeated guest-count sync failures.
Staff may see PMS_GUEST_COUNT_RETRY_EXHAUSTED.
Why this happens: Temporary PMS or network failures continued after four guest-facing attempts. AVA stops the guest retry loop, but keeps the guest-count change pending.
Fix:
-
Stop asking the guest to retry the same step.
-
Continue with your staff-assisted or manual check-in process.
-
Compare the registered guest count with the reservation in your PMS.
-
Correct the PMS reservation if the counts do not match.
-
Resume the pending guest-count change when the staff flow allows it.
✓ The guest can continue through staff support without repeating a blocked retry.
Contact support if the staff flow cannot resume after the PMS is available.
Bulk upload errors
What you see: Errors appear next to specific passports in Upload All Documents mode, such as:
- "Document number not detected"
- "Already uploaded for [guest name]"
- "Guest limit reached"
- "Payment method is not enabled for reservations"
Fix:
- For detection errors, select Rescan passport and scan in better lighting
- For duplicates, assign the passport to a different guest
- For guest limits, select an existing guest instead of creating a new one
- For Opera payment-method errors, enable the payment method for reservation use in Opera
- If errors persist, close the modal and use individual upload for problem passports
Scanner actions are below the screen
What you see: The scanner opens, but Proceed, Next, or the upload link is not visible.
Fix:
-
Scroll within the scanner modal until the action bar appears.
-
Keep the browser window at its full height during scanning.
-
Select Proceed or Next from the sticky action bar.
-
If the controls remain hidden, close the modal and open Upload All Documents again.
✓ The scanner keeps the action bar visible while you review or capture a document.
Verification code requested during bulk upload
What you see: Selecting Insert Guests opens a Verify Your Booking panel instead of saving. This happens when AVA finds a borderline name mismatch.
Fix:
-
Open the booking email and find the 4-digit code
-
Enter the code and select Verify Code
-
If the email has not arrived, select Resend Code after the countdown ends
-
If the code keeps failing, double-check you are reading the newest email
✓ AVA saves the assignments on its own once the code is accepted.
If document names differ but no verification panel shows, the name match may be too weak for this fallback. OTP Fallback for Name Mismatch or booking name verification for partial matches may also be off. See Document Checks. In ACI, check whether the staff override is enabled for your property. The override prompt replaces guest OTP when it is turned on.
Facial verification keeps failing
What you see: "Facial Verification Failed" or mismatch screen.
Fix:
- Retake the selfie in brighter lighting
- Re-upload the document if the portrait is blurry
- If the guest cannot pass, follow your manual review policy
Signature or facial verification takes too long
What you see: The signature or facial step takes longer than expected.
Fix:
- Wait briefly for AVA to finish saving the result.
- Continue the check-in if the step shows as complete.
- Refresh the guest or reservation record later to confirm downstream details.
- Contact support if the saved result or guest status is missing after you refresh.
AVA keeps a saved signature or facial-verification result when connected services respond slowly. The remaining sync can finish after the guest-facing step returns.
ACI staff override is unavailable
What you see: A two-device ACI facial failure appears, but Staff override is unavailable.
Fix:
- Confirm the staff device is verified for the current hotel.
- Confirm the guest tablet remains paired to the current reservation.
- Re-send Facial Verification from the staff panel.
- Ask the guest to complete the facial step again.
- Keep the active facial failure visible, then select Staff override.
- Enter a reason after checking the guest's identity in person.
✓ The override should work for the current active two-device ACI failure.
If it remains unavailable, follow your manual review policy and contact support.
ACI resend does not reopen the camera
What you see: You re-send the same ACI facial step, but the guest tablet keeps the old mismatch screen.
Fix:
-
Confirm the staff panel still shows the correct reservation.
-
Re-send Facial Verification from the staff panel.
-
Wait for the guest tablet to reopen the camera.
-
Ask the guest to complete the facial step again.
-
If the tablet shows Pair this tablet, restore the two-device pairing first.
✓ The guest tablet should show a fresh facial-verification prompt.
Room access not showing
What you see: No code or keycard option after check-in.
Fix:
- Refresh the room card and confirm check-in is complete
- If Room Access shows Pending or Partial success, wait for it to finish.
- Go to Settings → Room Access and confirm the active room access method
- Return to check-in and open Room Information again
- Check for a Room Access error message and follow the instructions
- If access still does not appear, contact support
If Room Access returns a structured failure, AVA now shows the upstream message first.
That can include nested message or error.message text from Room Access or PMS.
You should no longer see [object Object] in this flow.
Keycard room cannot be determined
What you see: AVA cannot open the keycard flow because it cannot determine the reservation room.
Fix:
- Refresh the room card.
- Confirm the reservation has an assigned room in your PMS.
- Open Room Information again.
- Retry Retrieve Keycard.
- Contact support if the room is assigned but the message returns.
AVA accepts valid long or internal-looking PMS room identifiers. Do not change the room identity manually.
Keycard controls are hidden in ACI
What you see: You do not see Retrieve Keycard or Already Encoded after check-in.
Fix:
- Confirm the staff handover first.
- Wait for the room card to refresh.
- Select Retrieve Keycard or Already Encoded once the buttons appear.
Still Stuck?
Contact success@vouch-technologies.com if:
- ❌ A reservation cannot be found after scan or confirmation number
- ❌ Cloudbeds reservation lookup times out or shows a service error
- ❌ Check-in remains blocked after all steps are complete
- ❌ Two-device ACI or same-name grouping remains unavailable after re-verification
- ❌ Room access does not appear after check-in
Helpful to include:
- Screenshot of the error
- Reservation confirmation number
- Guest name and arrival date
- Time the issue started