Check-In Policy
Set age limits, check-in time, and room rules. Most properties finish in about 5 minutes.
This guide helps you set who can self check-in, when they can start, and which rooms are eligible. These rules apply to both self-service and assisted check-in flows.
Where to Find It
Settings → Check-In → Check-In PolicyQuick Reference
| Setting | What It Controls | Guest Impact |
|---|---|---|
| Minimum Age | Youngest guest allowed to self check-in | Underage guests are directed to the front desk |
| Child Maximum Age | Age at or below which scanned guests count as children | Sends the correct adult and child mix to your PMS |
| Allow DOB Editing | Whether guests can correct OCR birth dates | Prevents accidental age blocks from OCR errors |
| Allow Travel Document Upload | Allows a photo upload instead of a live camera scan | Guests can upload a passport or ID photo |
| Image Retention Policy | Automatically deletes travel document and selfie images after set days | Older images may be removed after you apply changes |
| Document Storage | Chooses where captured documents and signatures are stored | Controls storage destination for check-in records |
| PMS Upload Policy | Controls whether supported check-in documents are sent to your PMS | Documents can stay in Streamliner without syncing to PMS |
| Registration Card Upload Timing | Chooses when supported registration cards upload to your PMS | Uploads can wait until guest sync or check-in completes |
| Mandatory Guest Registration | Requires every PMS guest to finish registration | Additional guests cannot skip guest details |
| Allowed Check-In Time | Earliest time self check-in starts | Early arrivals see a wait message |
| Validate Check-In Time Only | Whether AVA checks only the time, or both the arrival date and time | Controls how strict early-arrival validation is |
| Long Stay Limit | Maximum nights allowed for self check-in | Long stays require staff check-in |
| Kiosk Welcome Buttons | Shows or hides Check-In and Check-Out on the kiosk welcome screen | Guests see only the buttons you enable on the kiosk home screen |
| Group Checkout | Lets the guest checkout flow handle linked reservations together | Guests can complete checkout for linked reservations in one flow when your PMS supports it |
| Show smart-lock PIN during guest checkout | Shows the stay's existing PIN for physical key return | Guests can reopen a smart container and return a physical key |
| Guest Step Auto-Advance | Opens the next required guest step after save | Keeps the check-in flow moving, or lets guests advance manually |
| Check-in blocking by mode | Applies selected payment, balance, reservation, routing, and code rules per journey | Sends blocked journeys to staff support |
| Room Automation | Separate controls for roomless reservations, pre-assigned room moves, and queueing | Controls room readiness checks and queue safety |
| Expected room-assignment behaviour | The before and after check-in matrix for roomless and pre-assigned reservations | Helps staff explain waiting and Room Ready emails |
| OPERA Specials Codes | Searchable codes for journey steps | Tracks registration, pre-auth, check-in, and check-out progress |
Set Check-In Blocking by Mode
Use separate blocking rules for Pre-arrival, Self Check-In, and Assisted Check-In. Check-out rules remain separate from these settings. The selected mode displays its code list only after you enable code rules. Switch modes to review or edit another mode's list.
| Rule | What It Blocks |
|---|---|
| Block Check-in When Guest Needs To Pay At Hotel | A journey with hotel payment due and an outstanding balance |
| Block Check-in for Outstanding Balance | A journey with a folio balance above zero |
| Block Kiosk Check-In for Travel Agent Bookings | A journey booked through a travel agent |
| Block Kiosk Check-In for Existing Routing Instructions | A journey with routing instructions |
| Apply Check-In code rules for this mode | Reservations matching one of the selected check-in codes |
Kiosk-code controls require the active PMS to report support for this capability. Opera supports this capability, including normalized OHIP aliases. Cloudbeds, Mews, eZee, AVA, and Furama currently hide these controls.
Existing flat blocking settings keep their Self Check-In behavior. Pre-arrival and Assisted Check-In blocking starts off until you enable it.
-
Find Check-in blocking by mode.
-
Select Pre-arrival, Self Check-In, or Assisted Check-In.
-
Turn on the rules that should block that journey.
-
To use codes, turn on Apply Check-In code rules for this mode.
-
Add codes in Block Kiosk Usage for Check-In Codes.
-
Use Copy from Self Check-In when another mode should use the same codes.
-
Click Save Check-In Policy.
✓ Each journey applies only the rules saved for its selected mode.
After copying codes, turn on Apply Check-In code rules for this mode separately. Copying only fills the mode's list.
When kiosk-code controls are unavailable, you can still edit hotel-payment and outstanding-balance rules.
These controls affect check-in journeys only. Your existing checkout blocking settings continue to work separately.
A mode still allows a blocked reservation
What you see: A reservation with a matching code continues in one check-in journey.
Fix:
- Return to Settings → Check-In → Check-In Policy.
- Select the affected journey under Check-in blocking by mode.
- Confirm Apply Check-In code rules for this mode is enabled.
- Confirm the matching code appears in Block Kiosk Usage for Check-In Codes.
- Click Save Check-In Policy.
- Retry the reservation lookup in the affected journey.
Each mode has its own code-list setting. Copy from Self Check-In copies the current Self Check-In codes into another mode. It does not link future changes between modes.
Before you save the new mode policy, existing flat check-in blocking settings continue applying to Self Check-In. Pre-arrival and Assisted Check-In do not inherit those settings automatically.
Kiosk-code controls are missing
What you see: You cannot find the mode selector, code-rule checkbox, or code list.
Why this happens: Your active PMS does not report the kiosk-code capability.
Fix:
-
Open Settings → Essentials → PMS Integration.
-
Confirm the intended PMS is active and connected.
-
Return to Settings → Check-In → Check-In Policy.
-
If your PMS is Opera or OHIP, refresh the page after reconnecting.
-
Use payment or balance rules when your PMS does not support kiosk codes.
✓ AVA keeps stored code values safe when capability data is missing temporarily.
Do not switch PMS providers only to restore kiosk-code controls. Choose rules supported by your active PMS and operating workflow.
Set Guest Eligibility
Minimum Age for Check-In
- Go to Settings → Check-In → Check-In Policy
- Enter a value in Minimum Age for Check-In (commonly 18 or 21)
- Click Save
How it works:
- The age check applies to the primary guest on the reservation
- If the primary guest is under the minimum age, self check-in is blocked
- Age is calculated from the Date of Birth captured during registration
Set the Child Maximum Age
Use Child Maximum Age to classify guests scanned during check-in. Guests at or below this age count as children. Older guests count as adults.
The setting accepts whole numbers from 0 to 17.
It defaults to 12, matching the existing Age 0-12 guest form label.
PMS vendors do not provide their child age band through the integration. Set this value to match the child age band used by your property's rate plans. If the values disagree, your PMS may reject the adult and child mix.
-
Find Child Maximum Age under Guest identity & documents
-
Enter the maximum child age used by your PMS rate plans
-
Click Save
✓ AVA uses the saved boundary when it classifies scanned guests during check-in.
For example, 12 classifies guests aged 0–12 as children.
It classifies guests aged 13 and older as adults.
Allow Guests to Edit Date of Birth
Use Allow editing guest date of birth to control whether guests can fix OCR errors:
- Enabled: Guests can correct the scanned date of birth
- Disabled: Date of birth stays locked to the scanned document
Consider disabling when:
- Local regulations require an exact document match
- You need strict age verification (for example, age-restricted amenities)
Allowing edits reduces false age blocks when document scanning misreads dates.
Allow Travel Document Upload
Use Allow travel document upload to let guests upload a document photo:
- Enabled: Guests can upload a passport or ID photo
- Disabled: Guests must scan with a live camera
- Go to Settings → Check-In → Check-In Policy
- Turn Allow travel document upload on or off
- Click Save
Set Image Retention Policy
Use Image retention policy to delete stored images after a set number of days.
If a toggle is off, Streamliner does not delete that image type based on retention.
Saving a shorter retention period deletes existing travel document or selfie images older than the selected days immediately.
-
In Image retention policy, turn on Travel document or Selfie
-
Enter retention days (1-365). Default is 180.
-
Click Save
-
If a confirmation window appears, type
DELETE IMAGES -
Click Save and apply now
✓ Your retention policy is saved and active.
If you change image retention and click Save right away, AVA uses your latest values. The confirmation window also appears when the change needs destructive approval.
Set Document Storage
Use Document storage to choose where check-in documents and signatures are stored.
-
In Document storage, use Use your own server (on-premises)
-
Choose one mode:
- Turn it OFF to use S3 cloud storage
- Turn it ON to use your on-site image storage service
-
If on-premises is ON, enter your Image storage URL
-
If a secret is shown, click Copy next to Image storage secret
-
Click Save
✓ Your document storage setting is saved.
The Image storage secret field is read-only. You can copy it when a value exists.
Set PMS Upload Policy
Use PMS upload policy to control which check-in documents Streamliner sends to your PMS.
This does not change local storage or retention rules in Streamliner.
Check PMS attachment support
AVA checks your active PMS capabilities before it offers document-upload controls. Travel-document and registration-card support are checked separately.
| Document | What AVA checks | If unsupported |
|---|---|---|
| Travel document | Travel-document attachment support | AVA keeps the document locally and skips PMS delivery |
| Registration card | Registration-card attachment support | AVA keeps the card locally and skips PMS delivery |
Profile-photo support does not count as travel-document support. An unavailable control means AVA verified that your PMS cannot receive that document type. This does not affect document storage, retention, or downloads in AVA.
Your PMS can support travel documents but not registration cards, or the reverse. Check each control separately before you test a guest check-in.
Furama iPMS supports both travel-document and registration-card attachments. When Upload registration card to PMS is enabled, AVA sends the signed card using your selected timing. Review delivery in Operations → Command Center.
In v4, AVA saves travel documents and guest photos locally first.
It then delivers them to your PMS asynchronously when the guest becomes Verified.
This is the default behavior for existing setups.
Legacy missing or guestSync timing values also use guestVerified.
Explicit checkIn timing still works for older records.
For sharer reservations, AVA sends each verified guest's travel document to that guest's own PMS reservation.
This keeps the document attached to the correct sharer.
If Upload travel document to PMS is off, AVA skips the upload.
Only large document photos are compressed before PMS upload.
Smaller files stay unchanged.
The document can appear in AVA before PMS delivery finishes.
Check the attachment status in Operations → Command Center.
-
In PMS upload policy, turn on or off:
- Upload travel document to PMS
- Upload registration card to PMS
-
Click Save
✓ Your document sync policy is saved. ✓ AVA shows PMS delivery progress separately from local document storage.
If your active PMS is AVA, these toggles are disabled. This policy does not apply to AVA PMS.
Set Registration Card Upload Timing
Use Registration card upload timing to choose when AVA sends the card to your PMS.
By default, AVA uses When check-in completes. That keeps existing properties on the current flow. AVA generates and stores the registration card before PMS delivery starts. The card can appear in AVA while the PMS upload remains pending.
-
In PMS upload policy, turn on Upload registration card to PMS
-
In Registration card upload timing, choose one:
- When guest syncs - AVA uploads after PMS guest sync succeeds
- When check-in completes - AVA uploads after check-in finishes
-
Click Save
✓ Your registration card timing is saved.
You only see this setting when Upload registration card to PMS is on. It stays hidden for AVA PMS. If the saved value is missing or invalid, AVA falls back to When check-in completes. After the card is saved, check its attachment status in Operations → Command Center.
If your property uses Opera in an accompany-profile multi-room flow, AVA uploads the main guest's registration card for room 2. This happens when Registration card upload timing is When guest syncs and room 2 guest verification becomes Verified. It still uses the main guest's signature when only the main guest signs.
Require Guest Registration for PMS Guests
Turn this on when every guest attached to a PMS reservation must complete registration. This takes about 1 minute.
Use Mandatory Guest Registration to require registration for every guest linked to the reservation.
-
In Registration, turn on Mandatory Guest Registration
-
Click Save
✓ Every PMS guest must complete registration before check-in finishes.
This setting appears for all PMS providers. Opera-only registration controls still stay in the Registration section.
Use OPERA Special Code Suggestions
When your active PMS is an OPERA-family PMS such as Opera or OHIP, AVA loads matching special code suggestions for each journey field. Other PMS providers ignore these fields, so they do not affect non-Opera reservations.
You can still type a code manually if you do not want to use a suggestion.
If your PMS request includes a lifecycle override, AVA uses that code first. If the PMS setting is blank or null, AVA keeps the last saved code instead of clearing it. Checkout uses the same lifecycle path as registration, pre-auth, and check-in. You do not need a separate checkout special-code call.
During Opera registration, AVA can post the active Cash payment method first when the reservation has none. It uses Opera's payment type list and leaves existing payment methods unchanged.
-
Find the OPERA Specials Codes section
-
Fill in these journey fields:
- Specials code for registration
- Specials code for pre-authorisation
- Specials code for check-in
- Specials code for check-out
-
Start typing in each field to search the list of valid codes
-
Select a suggestion or enter your own code
-
Click Save Check-In Policy
✓ Your code values stay editable and searchable.
Suggestions appear only when your active PMS is Opera or OHIP and the PMS settings are complete.
Entered values must match Opera Specials exactly. Wrong values can break status mapping.
Set Check-In Time
- In Allowed Check-In Time, choose your official check-in time
- Click Save
Format rules:
- Use 24-hour format (example:
14:00) - Leave empty to allow check-in at any time
Guest experience:
- Before check-in time → the early arrival message appears
- After check-in time → guests can continue if other rules allow it
Validate Check-In Time Only
Use Validate Check-In Time Only when you want AVA to check the time without comparing the arrival date.
- Yes: AVA validates using check-in time only
- No: AVA validates using both arrival date and check-in time
-
Turn Validate Check-In Time Only on or off
-
Click Save
✓ Your check-in time validation rule is saved.
Use Yes if your property wants a time-only rule for arrivals. Use No if you want arrival date and time checked together.
Payment Settings Moved
Payment gateway setup now lives in Settings → Payment. Accommodation, checkout rounding, and Opera-specific payment controls now live in Settings → Payment.
Use that page to configure:
- Gateway connection (Stripe or Red Dot)
- Deposit and full payment collection
- Accommodation charge policies, checkout rounding, and Opera-specific payment controls
Check-In Balance Policies
This takes about 2 minutes. Turn on one balance policy, then return to Payment if your PMS supports rounding.
Use these settings when you want AVA to block or settle an outstanding balance during check-in or checkout.
During checkout, an evaluated PMS payable amount controls the amount due. A PMS payment-waiver flag alone does not bypass Check-in outstanding-balance blocking. Checkout rounding also depends on the active PMS capability.
| Setting | What It Controls | Payment Impact |
|---|---|---|
| Check-in outstanding-balance blocking | Stops check-in until the balance is resolved | Enables rounding adjustment in Settings → Payment |
| Checkout balance settlement | Collects the remaining balance during checkout | Also enables rounding adjustment in Settings → Payment |
-
Turn on Check-in outstanding-balance blocking or Checkout balance settlement.
-
Click Save.
✓ AVA keeps the saved values for these settings. ✓ Rounding controls in Payment become active while one of them stays on.
If both balance policies are off, AVA keeps the saved rounding value in Payment. It just stops affecting the payment flow.
Rounding settings stay inactive
What you see: Rounding adjustment in Settings → Payment is disabled or has no effect.
Fix:
- Open Settings → Check-In → Check-In Policy.
- Turn on Check-in outstanding-balance blocking or Checkout balance settlement.
- Save the settings.
- Return to Payment Gateway Integration.
Housekeeping Coordination
Prompt Housekeeping to Confirm Same-Day Checkout
Enable this if you want housekeeping to confirm checkout before finishing a same-day cleaning update. It helps staff close out rooms that were missed by front desk.
Long Stay Restrictions
- Enable Block Long Stay Check-ins
- Set Maximum Nights for Kiosk Check-in
- Click Save
Reservations longer than this limit must check in with staff.
Set Kiosk Welcome Buttons
Use Kiosk Welcome Buttons to show or hide the Check-In and Check-Out buttons on the kiosk home screen.
These settings apply only when the kiosk runs in mode=cci.
Use Set Up the Kiosk Welcome Screen to control Request Assistance. Use Set Up Guest Lost Keycard Replacement to control the I lost my keycard option.
- Go to Settings → Check-In → Check-In Policy
- Find Kiosk Welcome Buttons
- Turn Check-In and Check-Out on or off
- Click Save
✓ AVA keeps the saved button values, even when you turn a button off. ✓ The kiosk welcome screen updates after you reload it.
Use the existing Walk-In Booking setting to control the Walk-In button. AVA shows that button based on booking capability, not this setting.
Set Group Checkout
Use Group Checkout to control whether related reservations can finish checkout together.
AVA shows this setting only when your active PMS reports Group Checkout support. Opera currently reports support. Other PMS providers hide this setting and checkout flow.
-
Find Group Checkout in the checkout controls section
-
Turn Group Checkout on or off
-
Click Save
✓ AVA remembers your choice for the guest checkout flow. ✓ When this is on, the Group Checkout tab appears on the checkout screen.
Turn this on when you want guests to finish linked reservation checkouts together. Leave it off when you want each reservation to check out separately.
Show a Smart-Lock PIN for Physical Key Return
Use this only when guests must reopen a smart container to return a physical key.
Leave this setting off unless your hotel uses SmartLock PINs for physical key return.
-
Find Physical key return.
-
Turn on Show smart-lock PIN during guest checkout.
-
Click Save.
✓ Eligible guests see the stay's existing PIN before checkout completes.
AVA shows this step only when the reservation has an existing SmartLock PIN. Locker codes and other room-access methods are not shown by this setting.
Set Guest Step Auto-Advance
Use Guest Step Auto-Advance to decide whether AVA opens the next required guest step after you save.
-
Find Guest Step Auto-Advance
-
Turn it on to keep the current auto-open flow
-
Turn it off to make guests and staff open each step manually
-
Click Save
✓ New check-in steps follow the setting immediately.
If the setting is missing, AVA treats Guest Step Auto-Advance as on. That keeps existing hotels on the current flow.
Room Automation and Room Status Rules
Most hotels spend about 5 minutes here. Start with room automation, then choose allowed room statuses.
This section controls when AVA assigns rooms, queues reservations, or leaves staff to resolve them.
AVA disables unsupported toggles and explains why. If your PMS cannot auto-assign rooms, you must assign rooms in the PMS first.
When a reservation already has a room, AVA checks that room's current PMS status before assignment. Occupied, locked, out-of-service, missing, and unverified rooms are rejected. The room must also provide positive vacancy evidence. If the room is not eligible, AVA rejects the assignment before writing it to the PMS. After check-in time, CCI can send the reservation through the Room Not Ready queue.
Assign a room when no room is assigned
Use this control when a reservation has no room yet.
When enabled, AVA asks the PMS for an available room. When off, AVA leaves the reservation queued or for staff to assign.
If your active PMS is eZee, this control stays disabled. AVA does not use this automatic room-assignment toggle for eZee. For eZee, assign-room still needs one clean room of the booked type.
If Allow Vacant Dirty Rooms is enabled, AVA turns off automatic room assignment. That prevents guests from being assigned to unclean rooms.
For eZee, AVA only offers clean rooms during assign-room. If every matching room is dirty, clean one room in Housekeeping and try again.
Furama iPMS v2 supports Allow Vacant Dirty Rooms during check-in. AVA allows an assigned Dirty room only when Furama confirms that it is vacant. AVA rejects occupied, locked, out-of-service, missing, or unverifiable rooms before assignment. AVA also rejects a room when Furama reports a maintenance block, even if its housekeeping condition is allowed. Use this only when your front desk has approved the room for guest arrival.
If Opera returns the same valid room, AVA keeps it. If Opera needs a different room and reassignment is off, AVA queues the room assignment. If Opera rejects the room as not vacant clean or inspected, AVA shows Room Not Ready messages.
Move a pre-assigned reservation when the room is unavailable
Use this control when a reservation already has a room, but that room is unavailable after check-in time.
When enabled, AVA can move the reservation to another eligible room. AVA checks the assigned room before queueing. If the room is occupied, locked, out of service, missing, or unverifiable, AVA rejects it. If the PMS does not confirm vacancy, AVA fails closed and keeps the room out of the queue. When off, AVA keeps the original room and follows the queue flow below.
If PMS refresh succeeds and the reservation no longer has a room, AVA clears the stale local room. When roomless assignment is on, AVA then uses the normal auto-assign flow for a clean or inspected replacement. If PMS refresh fails, AVA keeps the existing room target.
Allow Room Assignment Without Housekeeping Status
Enable this if your PMS does not send housekeeping status. When enabled, AVA ignores room status filters. AVA still verifies pre-assigned rooms before queueing them. If AVA cannot verify the room, it does not queue the booking.
Allowed Room Statuses
Choose which room statuses are eligible for check-in:
- Allow Vacant Inspected Rooms (recommended)
- Allow Vacant Clean Rooms
- Allow Vacant Dirty Rooms (emergency only)
Allowing dirty rooms can create health and service issues. Use only when you have a manual process in place.
At least one room status must be enabled for self check-in to work.
AVA shows Allow Vacant Dirty Rooms only when your active PMS supports dirty-room check-in. If the setting is disabled, AVA names the PMS blocking this capability. Assign a clean or inspected room before guest check-in.
Multi-Room Readiness Checks
When a reservation has multiple assigned rooms, AVA rechecks every room right before check-in starts. If any assigned room is not eligible, AVA blocks the whole reservation family. For Opera, the PMS room must match the room already assigned to that reservation. If Opera returns a different available room for a Dirty preassigned room, AVA treats it as not ready.
Expected room-assignment behaviour
Use this table to match the current room automation settings.
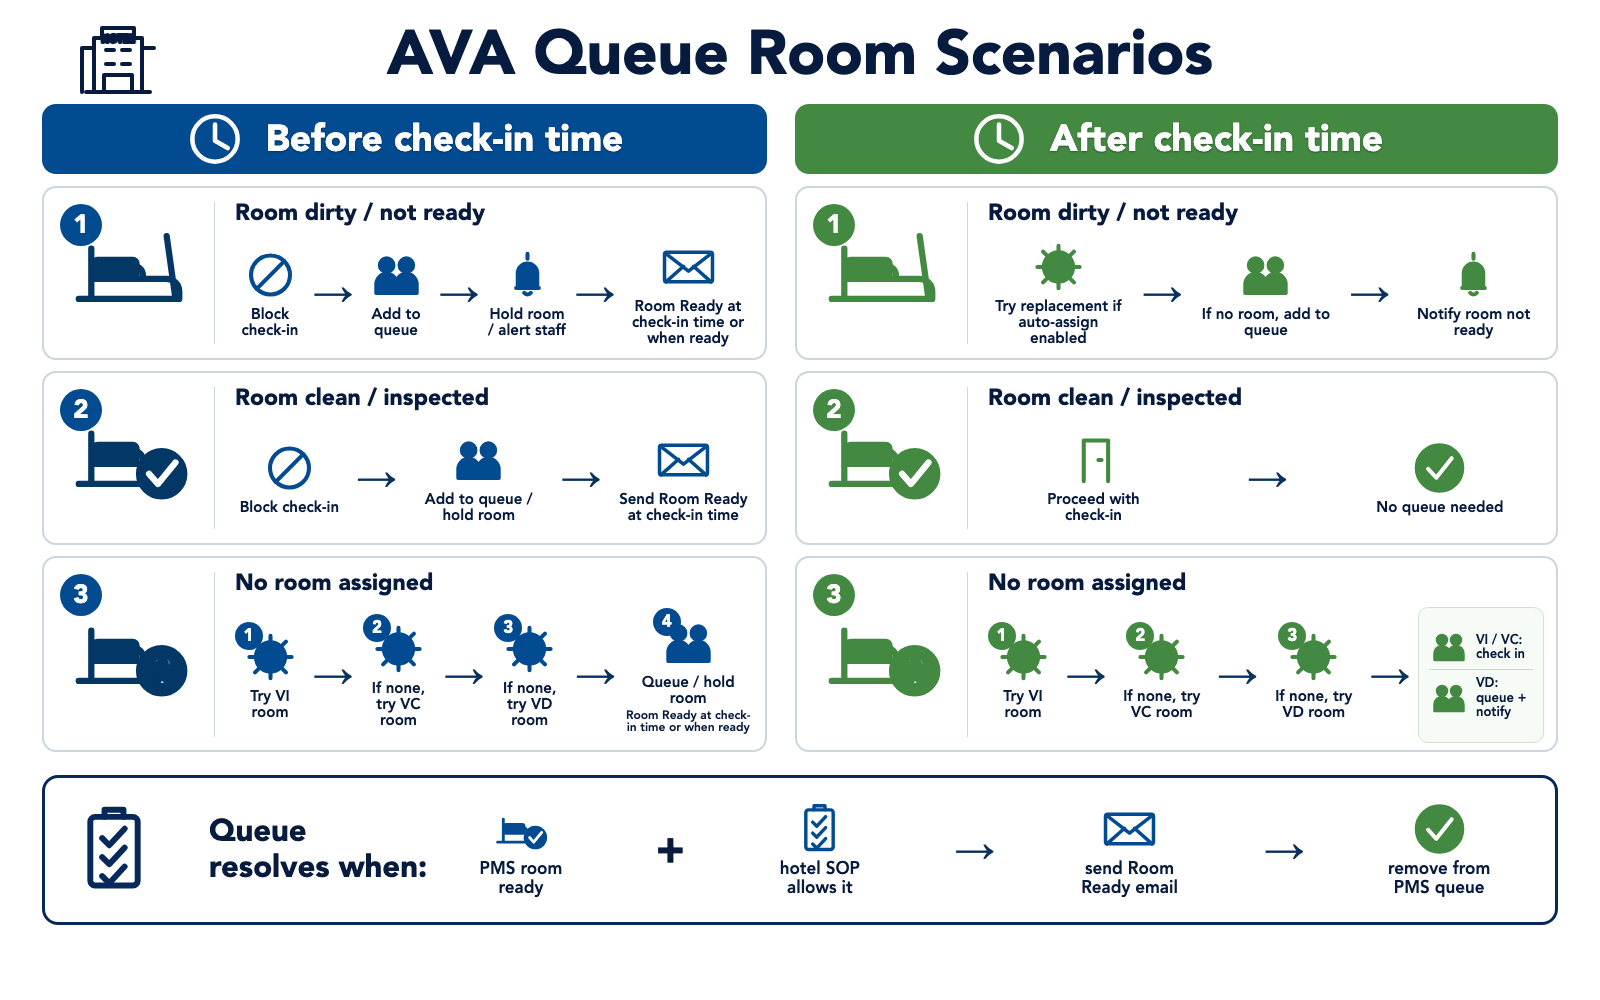
| Reservation state | Before check-in time | After check-in time |
|---|---|---|
| Room not assigned | If Auto Queue Room is on, AVA tries to assign a room first. If none is ready, it queues the booking. If Auto Queue Room is off, the guest stays in the before-check-in flow. | If automatic assignment is on, AVA assigns an available room. If it is off, staff must assign a room or queue the booking. |
| Room pre-assigned | AVA keeps the original room. If Auto Queue Room is on, AVA checks the room first. Unsafe or unverified rooms stay out of the queue. | If reassignment is on, AVA uses another available room when the original room is unavailable. If it is off, AVA queues only eligible rooms or staff resolves it. |
| Room already clean or inspected | AVA continues check-in. | AVA continues check-in. |
Queueing requires queue support from your PMS. If PMS queueing is unavailable, AVA still blocks check-in and shows the not-ready message. The reservation may not stay in the PMS queue.
By default, when a queued room becomes ready, AVA removes the booking from the PMS queue. The Room Ready email and DO-NOT-MOVE alert still send. To keep the booking on the queue, turn on Keep Booking in Queue When Room Is Ready.
You can turn on roomless assignment without enabling pre-assigned room replacement. You can also enable pre-assigned room replacement without changing roomless assignment.
Troubleshooting
Guests are blocked unexpectedly
What you see: Valid guests sent to front desk
Check:
- Minimum Age and DOB accuracy
- Child Maximum Age and the PMS rate-plan child age band
- Allowed Check-In Time
- Validate Check-In Time Only
- Long stay limit
- Room status eligibility
- Payment setup in Settings → Payment
PMS rejects the adult and child mix
What you see: A reservation with children fails after document scanning. The PMS may report that no matching rate exists for the guest mix.
Why this happens: Child Maximum Age does not match the rate plan's child age band. AVA must classify scanned guests before it sends their adult and child counts to the PMS.
Fix:
-
Open the reservation's rate plan in your PMS.
-
Confirm the child age band for that rate plan.
-
Go to Settings → Check-In → Check-In Policy in AVA.
-
Set Child Maximum Age to the same maximum age.
-
Click Save, then retry the guest registration.
✓ The PMS should receive the correct adult and child mix.
Upload option is missing
What you see: Guests only see live camera scan
Fix:
- Turn on Allow travel document upload
- Save your changes and test again
Confirmation button stays disabled
What you see: Save and apply now is gray in the confirmation window.
Fix:
- Type
DELETE IMAGESexactly as shown - Click Save and apply now
Retention days field is gray
What you see: You cannot edit the retention days.
Fix:
- Turn on Travel document or Selfie
- Enter the number of days
On-premise storage URL keeps reverting
What you see: The Image storage URL does not stay saved.
Fix:
- Turn ON Use your own server (on-premises)
- Enter a full URL, for example
https://image-storage.yourhotel.local - Click Save and refresh the page once
Copy button is disabled for image storage secret
What you see: Copy is gray and cannot be clicked.
Fix:
- Turn ON Use your own server (on-premises)
- Confirm a secret value exists in Image storage secret
- If empty, ask your admin team to set the secret first
PMS upload toggles are disabled
What you see: You cannot change Upload travel document to PMS, Upload registration card to PMS, or timing.
Why this happens: AVA disables controls when your active PMS reports no support for that document type.
Fix:
-
Check your active PMS provider in Settings → Essentials → PMS Integration.
-
Check whether travel-document and registration-card support differ for your PMS.
-
If the control remains unavailable, keep the document in AVA or contact support.
✓ An unavailable control does not prevent local document storage or downloads.
Registration card timing option is missing
What you see: You cannot find Registration card upload timing.
Fix:
-
Turn on Upload registration card to PMS
-
Confirm your PMS reports registration-card attachment support
-
Save the page again
-
Reopen Settings → Check-In → Check-In Policy
✓ The timing option appears only when registration-card delivery is available.
Automatic room assignment is disabled
What you see: The room automation toggle is off, disabled, or missing.
Fix:
- Check your active PMS
- If it is eZee, this is expected
- If the PMS does not support room assignment, AVA disables the toggle
- If the PMS does not support queueing, Auto Queue Room stays hidden
- Ensure Allow Vacant Dirty Rooms is OFF
- Make sure your PMS sends room status updates
- If you need roomless auto-assign, use a PMS that supports it
- If you also want to move pre-assigned rooms, enable the separate room-unavailable control
Vacant dirty-room check-in is disabled
What you see: Allow Vacant Dirty Rooms is disabled, with a note naming your PMS.
Why this happens: Your active PMS does not support dirty-room check-in.
Fix:
-
Assign a Clean or Inspected room before guest check-in.
-
Confirm the correct PMS is active in Settings → Essentials → PMS Integration.
-
Contact support if your PMS should support dirty-room check-in.
✓ The setting becomes available when your PMS reports support for this capability.
Furama iPMS v2 supports room operations and dirty-room check-in. If Allow Vacant Dirty Rooms is missing for Furama, refresh the page and confirm the active PMS connection.
Early arrival message never appears
What you see: Guests check in early without a message
Fix:
- Set Allowed Check-In Time
- Add messages in Room Not Ready Messages
Check-in time validation feels too strict
What you see: Guests are blocked even when the check-in time looks correct.
Fix:
- Check Validate Check-In Time Only
- Set it to Yes if you want time-only validation
- Set it to No if you want arrival date and time checked together
- Save and test with a new reservation
Group checkout option is missing
What you see: Guests can only check out one reservation at a time.
Fix:
- Go to Settings → Check-In → Check-In Policy
- Confirm your active PMS is Opera and the connection is active
- If the setting appears, turn on Group Checkout
- Save your changes
- Reload the guest checkout screen and test again
Opera currently reports Group Checkout support. Other PMS providers do not show the setting or checkout flow.
Smart-lock PIN does not appear during checkout
What you see: The guest moves directly to checkout without a key-return step.
Fix:
- Turn on Show smart-lock PIN during guest checkout.
- Confirm the stay already has a SmartLock PIN.
- Confirm the room uses SmartLocks.
- Save the setting and start a new checkout lookup.
Opera specials codes are not taking effect
What you see: Journey progress is not marked correctly in Opera.
Fix:
- Confirm your active PMS is an OPERA-family PMS
- Check each code matches Opera exactly (including spelling)
- Save again using Save Check-In Policy
- Test with a new check-in session
OPERA code suggestions do not appear
What you see: The special code fields stay empty or show no matches.
Fix:
- Confirm your active PMS is an OPERA-family PMS
- Check that the OPERA PMS settings are complete
- Type part of the code to filter the list
- Enter the code manually if you already know it
- Save and reopen the page
Related Guides
- Registration Fields - Required guest information
- Room Not Ready Messages - Messages for early arrivals and delays
- Opera PMS Integration - Connect and validate Opera settings
Still Stuck?
Contact success@vouch-technologies.com if:
- ❌ Guests are blocked but should be eligible
- ❌ Room assignment is not working as expected
- ❌ You need help setting age or payment rules
Helpful to include:
- Screenshot of your policy settings
- Example reservation that is blocked
- PMS provider and property type